
photo tips
Spectacular Spooky Halloween Photographs!

Snap a Few Photos Early:
If you want to shoot indoors or want to experiment with such things as flash diffusion, it might bode well to take some practice shots the night before and note your settings or adjustments. While it’s always fun to experiment on the fly, you’ll have young kids all dressed up and anxious to hit the streets for free treats. By experimenting early, you’ll be ready to apply what you’ve learned on the big night.
Take Photos of the Transformation:
We often take photos once the kids (and kids at heart) are already in costume, but this year, begin taking photographs as they prepare to transform themselves from mild mannered school children to mighty ninjas. Photos of them having their faces painted and putting on their masks and capes are a wonderful way to showcase the anticipation of the evening. You can also photograph their costumes laid out in advance or close ups of a particular item such as a sword, headdress or shield.
Get into Character!:
Let your kids indulge their imaginations by getting into character. You can take a few standard posed photos in front of the house, but this is the perfect opportunity to let them feel free to pose and play. Have them leap through the air in superhero fashion or strike poses with siblings and friends. If you’ve got a pet pooch that’s attracted to all the action, let him join in the fun, too!

Spooky Night Loves Low Light:
Halloween images are ideal for darker backgrounds and low light conditions because they enhance the mood of the holiday. If you can get your young models to stay still, use your tripod, slow your shutter speed and tighten the frame to create haunting close-ups of their faces. Play with different angles – try shooting a bit lower to the ground and looking up at your goblins to create a more menacing effect.
Make More Lighting:
If you’re photographing jack-o-lanterns, you may want to add more than a single candle inside. These carved pumpkins can be tricky subjects, so boosting the light inside may yield more needed contrast. You can also try using a small flashlight angled inside or even outside and propped up to create drama.
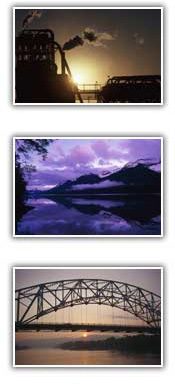
Dawn-Dusk Tips
Advance Setup
For a half-hour before the sun rises and after it sets, the sky is filled with a soft, rapidly changing light that has an almost magical ability to transform scenes. Starting with the first faint light at daybreak, colors brighten by the minute, going from cool blues through an ever- shifting series of pearly pastels to the warm hues that immediately precede sunrise. Forms that are, at first, merged into one shadowy shape gradually and almost imperceptibly become distinct and identifiable. In the evening after the sun stages its dramatic exit, the process is repeated in reverse.
To take advantage of these twilight periods, it's best to be prepared. Because the light changes so quickly, scout a scene in advance for the best camera angle. And because the light is so dim, plan to use a high-speed film.
Tools
A tripod or other firm camera support is also advisable. You might want to use a fairly small aperture to get good depth of field, which will often require exposure times too long for hand holding the camera. A photo of a skyline taken about 10 minutes after sunset might require a setting of 1/60 second at f/8 with 400-speed film, allowing the camera to be hand held. But by a half-hour after sunset, you'll probably need a full second a f/8, and that scene can only be taken with the camera on a support.
Exposure
Check exposure readings frequently; the darker the scene, the more important it is to bracket your exposure a full stop or more in either direction. If you have an automatic camera, bracket by temporarily changing the film-speed dial setting to half and then double the correct setting. This not only gives you an acceptable picture, but also allows you to select the final image nearest to the actual effect you want.
Twilight is also the time to take pictures that give the illusion of night. You should take these photographs during the few short minutes when the sky is deep blue, just after the darkness of night vanishes in the morning and just before it returns in the evening. The faint light still in the sky silhouettes subjects on the horizon while street lamps and other lights convey the impression of night.
Using Filters

How They Work
Filters are used in both color and black-and-white photography to solve certain technical problems and to achieve special visual effects. For example, because film cannot adjust for the different colors of light the way the human eye can, filters are often essential in making the hues and tones of a photographic image correspond to those we see with our eyes. Conversely, you might want to use a special-effects filter to intentionally create a vision of unreality.
Basically, a color filter permits light of its own color to pass through it and, to varying degrees, blocks the light of other colors. The extent to which this occurs depends on the color of the filter and its intensity. In general, closely related hues pass through while complementary colors are stopped. Thus, a yellow filter absorbs blue but lets most orange pass through. Only the light that gets through, of course, is recorded on the film.
Filter Factors
Nearly all filters, because they reduce the light entering the camera, require the use of a larger aperture or a slower shutter speed. The change, though now frequently given in f-stops, is traditionally specified as a filter factor -- a number that indicates how much you must increase your exposure. A filter factor of 2, for example, tells you that you must double your exposure -- the equivalent of a one-stop increase.
These factors are useful even if your camera has a through-the-lens metering system. If you're using a pale-colored filter, such as yellow or amber, the camera's meter will be fairly reliable. But if you're using a red filter to darken a blue sky and your subject includes a lot of green foliage, the filter will block so much light from the scene that the camera would probably overexpose to compensate. If in doubt, take a meter reading in the program mode before attaching the filter, and then see what the exposure setting is after you attach the filter. Is the difference approximately equal to the change recommended by the filter factor? If not, meter the scene in the metered manual mode without the filter, and use your camera's exposure compensation feature to provide the correct amount of additional exposure based on the filter factor. For instance, for a filter having a factor of 2, set a +1 compensation.
Types of Filters
There are basically two types of filters in common use: mounted glass disks that screw onto the front of the lens, and optical resin (usually referred to as plastic) squares that slip into filter frames and are fitted to the lens with an adapter ring. The size of a round screw-in filter is expressed in terms of its diameter in millimeters, and you simply match it to the diameter of your lens. One of the drawbacks of buying glass filters is that if you have lenses of different diameters you may have to buy the same filter in two or more sizes. Fortunately, the diameters of many lenses of a particular brand are now standardized, so this isn't as much of a concern as it once was.
Filters of the square resin style are all the same size, so they can be adapted to any lens by using inexpensive adapter rings. Resin filters are offered by several companies as part of very large filter systems that include all manner of technical and creative effects filters: correction, multi-image, multicolor, and masking filters, among others. In most cases, the square filter frames are designed to hold two or more filters in combination, so that you can create even more elaborate effects -- mixing a soft-focus filter with a colored one, for example. Back to top
Photographing Fireworks

Tips on the Simple Art of Photographing Fireworks
Every Fourth of July brings with it a real opportunity to apply some practical photographic techniques in capturing the night sky as a true work of art.
When it comes to photographing fireworks, you’ll find many photographers will argue that a beautifully captured image can often transcend the beauty of the actual event itself. If you arm yourself with a few basic tips, you can truly leverage the photographic experience by capturing bursts of light in a way that is nothing short of breathtaking.
Shooting Digital? Then Shoot Early, and Shoot Like a Mad Fool
The average length of a professionally executed fireworks display is no more than fifteen minutes long. Your window of opportunity, therefore, is extremely narrow.
So don't allow yourself to get bogged down by shooting only sporadically in the attempt to get the perfect shot. Use the first five minutes of the fireworks display to shoot early and often, while simultaneously reviewing your images on the spot. Stopping to review your work as fireworks are going off overhead might sound a bit counterintuitive…But if adjustments need to be made, they need to be made early. Once you’ve found a “sweet spot” as it relates to the settings on your camera yielding the exact results you’re striving for, then you’ve still got an additional ten minutes on the clock with which to capture images in a way that you’ve established to be the absolute ideal.
Tripod: Three Legs Worth of Absolute Necessity
Yes, you are definitely going to need a tripod, because you’ll be shooting at slow shutter speeds that at best will cause your images to appear “smeared” if you’re hand-holding the camera.
Depending upon what effect you might be going for, the length of your exposure will run anywhere between 2 to 30 seconds. That’s where the tripod comes in…It provides the unwavering stability you need in order to ensure seamless, perfect images of ascending shell trails and glorious bursts of light.
Interested in using a monopod to allow you to pick up and move locations quickly? Resist that temptation! A monopod likely isn’t going to provide the absolutely motionless stability you need in this situation.
Cable release
How about this concept…Rather than simply “working” as a photographer and cheating yourself out of the experience of watching and enjoying the display, allow yourself to have your cake and eat it too!
A cable release buys you that kind of flexibility and enjoyment. It allows you to depress the shutter release without having to do it by hand as you look through the viewfinder…It’s almost like a remote control, albeit not a wireless one. Attach the cable release, focus the camera on the sweet spot of the night sky, then simply step back and enjoy the show as you allow the cable release to shoulder some of the burden of actually “working” on a national holiday.
This Lens or That Lens: It Depends
Your choice in lenses is going to have a big impact on the end result yielded by your efforts.
If you're already physically pretty close to the action, and your goal is to fill the full frame with the actual bursts themselves, then a telephoto lens that operates within the 100mm to 200mm range is going to rise to the occasion very nicely.
If your end goal is to capture a total and comprehensive view of the fireworks that also incorporates additional and surrounding scenery, then a lens somewhere between 50mm and 80mm should accomplish the task.
A wide lens is the order of the day if you’re looking to incorporate silhouettes of people in the foreground as the bursts take shape in the background…Maybe something in between 24mm to 35mm.
Filter Out the Wrong Filters Ahead of Time
Don’t feel as if we’re talking down to you when we remind you to check the end of your lens for the proper filter. We’re reminding ourselves as we remind you, because more than once while shooting fireworks, we’ve made the mistake of having left a circular polarizer filter on the end of the lens. A polarizer is not exactly appropriate for the situation, as it will only decrease the amount of available light you have at your disposal.
You should, however, still have a UV filter at the end of your lens – if for no other reason other than to protect your expensive lens glass from the elements. In fact, we strongly believe that you should always have a filter protecting your lens for exactly that reason, regardless of the situation.
Shooting Film? Then You Have Choices to Make
Not everyone is shooting digitally. If you’re still a film buff – and there are a lot of us here who still are – you can use almost any type of film (negative, transparency, black and white) to capture the glory of the night sky.
Yet if you have choices, you might want to start off with color transparency film – in other words, slide film. The detail is extreme, and it lends itself well to eventual enlargements.
The choice of the “right” color transparency film varies from photographer to photographer. But if you’d like to indulge our recommendations, go with a film that’s going to provide extremely high color saturation while simultaneously offering a very tight grain structure. We might suggest Fujichrome’s Velvia 50 or Velvia 100F in such situations. The colors are explosive…A fitting description when looking for a film with which to shoot fireworks.
In reality, though, any film with speeds ranging from ISO 50 to ISO 200 will do some solid work for you. You may want to settle somewhere in the middle – such as ISO 100. It’s hard to go wrong with that selection.
Shutter Speed
Set your shutter speed to BULB.
BULB is an awful lot of fun to use. If you’ve never used it before and you’re unfamiliar with what it does, it basically allows you to keep the shutter open for as long as you have the shutter release held down.
Something you have to keep in mind while in BULB mode…Don’t simply press down and release quickly as you’re used to doing in normal situations. You’ll likely get nothing as far as a workable image is concerned. BULB allows for prolonged time exposures, and that’s exactly what we’re going to use it for here. So remind yourself to hold it down for varying lengths of time – anywhere from 2 seconds to 30 seconds – so that you can initially experiment with varying aesthetic results. Review photos you’ve taken early on in the course of the fireworks display, and make adjustments accordingly as to how long you’re holding down on the shutter release while in BULB mode.
Also keep in mind everything you’ll learn as you use the camera in BULB mode, because the same principles are also going to come into play in night photography in general…Particularly night photography featuring dark skies and brightly lit surroundings (example: lightning storms and amusement parks).
ISO – If You’re Shooting Digitally, Make Some Adjustments
With the shutter speed set to BULB, set your f/stop to the following:
ISO 50. . . . . f/5.6 or f/8
ISO 64. . . . . f/5.6 or f/8
ISO 100. . . . f/8 or f/11
ISO 200. . . . f/16
If you’re shooting with film, your camera is going to automatically set the ISO based on the film you’ve selected.
Yet if you’re shooting digitally, you may choose to dial down your ISO to the aforementioned settings, rather than allowing the camera to make ISO choices itself. After all, your camera doesn’t necessarily know what you’re shooting. And if you don’t find yourself with much occasion to play with your ISO settings manually – as is the case with many of us – this is an opportunity to branch out a bit.
A nice sort of side benefit to shooting at a low ISO is the grain or “digital noise” that images from some digital cameras can experience at higher ISO settings. As a general rule, low ISO equates to low grain or noise.
You’re Holding the Shutter Open. But For How Long?
Again, in BULB mode, you’re holding down the shutter release for longer than usual. But for how long exactly?
The answer to this question is going to vary, depending on the effect you’re going for. You may want to capture a singular burst in that same sort of way that your eye sees it happening. Or you may wish to keep the shutter open for a longer period of time in order to capture multiple bursts and their various trails. In no uncertain terms, this is a bit of a spontaneous experiment in action, but one you’ll get the hang of quickly before settling in to a pattern.
Holding Down the Shutter Release to Capture Singular Bursts
To best capture a singular burst, hold off until you hear the inactive “fizzle” sound of a particular shell being rocketed into the night sky. Open up your shutter as soon as you hear it. And keep it open, waiting for the burst to happen. Wait…Wait…Keep waiting until the burst has happened and it has completely run its course and all the twinkling it’s going to do is now over and done with. Now you can close the shutter.
You should have something nice to review now. Are the trails more exaggerated than you’d have liked? In that case, release the shutter earlier, before all the twinkling is over. Keep playing around until you get exactly what you want.
Holding Down the Shutter Release to Capture Multiple Bursts
If your end goal is to capture a series of bursts in a singular frame, wait for that same “fizzle” of the shell being launched. Then open up your shutter, wait for the burst to fully run its course, and then…immediately cover up your lens! In this scenario, you’re still holding down that shutter release…
…You’re just waiting for the sound of the next shell to receive its launch command. So when you hear it, uncover your lens, wait until the burst has again run its course, then cover your lens again.
As the creative force behind the composition of the image, you get to be the judge when it comes to how many bursts you want to attempt to capture in a particular frame. On that note, keep in mind that while “the more the merrier” might sound like a good approach to take, you may find that too many bursts in a singular frame leaves you with an image that can begin to look overly busy.
So if we’re going to use this “cover the lens” approach, what are we going to cover the lens with? In terms of suggestions, maybe it’s best to report anecdotally on what others have used…
Some have enlisted the help of a piece of dense black felt. Velvet can work to similar effect. You could simply use your hand, theoretically. And others take care to attend the event wearing a baseball cap that on a moment’s notice can double as a covering for the lens. The solutions are easy to source, but don’t forget to plan for them in advance.
The Forecast Calls for Smoke
Smoke is in your short-term forecast. And it might play a larger role in your photography than you’d ideally want it to. Don’t overlook your location, and the direction in which the wind – however subtle – is blowing. Quite simply, you don’t want clouds of smoke positioned between yourself and the surrounding bursts.
While making sure you’re upwind sounds like the logical route to take, that isn’t necessarily the case. If you’re upwind, and as the residual smoke works its way behind the fireworks that follow, you might find yourself in a position in which the bursts will be framed against a gray, smoky sky rather than a crisp, clear, night sky.
Rather than necessarily heading upwind, instead pursue a location that puts you at a right angle in relation to the direction of the wind. You’ll soon find that this location allows the smoke to completely exit the frame in the shortest amount of time.
Get Some Perspective
Give your photography a sense of time and place. You might want to take some shots in which bursts fill the full frame. But almost all photography benefits from perspective.
If you can, pull back a bit and try to include some buildings and landmarks…Familiar ones, if at all possible. In other words, if you’re in or around downtown Denver, you have the city skyline near you, and you have Mile High nearby…Take advantage of those locations. Also, as Denver is geographically very flat, taking to higher ground will then allow you to look down upon and capture an expanse of city lights, stretching out as far as the eye can see.
Incorporating perspective will only enhance the bursts of fireworks.
Perform a Background Check
As twilight arrives on the scene and you find yourself waiting for the fireworks to begin, take a precautionary look for any artificial lights. And make sure that none of them end up directly behind the area in the sky in which the fireworks are set to explode.
While buildings at night provide great context and great perspective, they won’t do you any favors if they’re positioned in such a way that allows the fireworks to go off directly in front of them. If you’re not careful, that street lamp that you failed to account for beforehand is now a massive and unwanted glowing ball of distraction that does your photography no great favors.
Focus on Focusing
It’s unlikely that you can rely on your camera to do the focusing when you’re shooting fireworks. Even the most advanced focusing systems might find themselves a little disoriented by fireworks going off in front or in back of each other. And if you’re including landmarks or scenery in your frame along with those bursts, you might further confuse your camera’s auto focusing system.
Use those initial few burst as an opportunity to set a definitive focus. Don't rely on a “focus to infinity” lens setting as you fire away. When that first array of bursts begins to happen, establish focus based on those bursts, and try to stick with that focus throughout the course of the fireworks show.
Get Vertical…And Get Horizontal
It’s the accidental pattern of so many photographers: You start to capture images, you get into a bit of a temporary habit, and then all of a sudden, we forget that we actually have the choice of holding the camera either horizontally or vertically.
Our advice? Try to avoid forgetting that you have the choice of shooting either way! Because if you’re shooting one way and not the other, chances are, you’re really limiting yourself and your photography. Take some horizontal shots. Take some vertical shots. Not only will the quality of your perspective influence the quality of your end results, but later, you’ll also find the entire collection of images you shot to be far more aesthetically pleasing to review as a group.
Print Pictures That Pop
In the context of printing pictures of fireworks and beyond – from digital or from film – we’ve found that the truest and most vivid representation of color is displayed only by pictures printed on Kodak Royal Generations ™ paper.
In the photographic industry, the ability of Kodak Royal Generations ™ to reproduce deep colors and unsurpassed contrast truly has no peer. And its unsurpassed archival quality ensures that every picture is a keepsake to be passed down from generation to generation.
As a result, we’re the only Colorado photofinisher that has adopted the Legacy Photofinishing quality standard throughout our area labs. And as a part of adhering to that standard, every print of yours that we craft in our labs will utilize Kodak Royal Generations ™.
When it comes to preserving your memories in the form of prints, we invite you to settle for nothing less.
HAVE A SAFE AND HAPPY FOURTH OF JULY!
Photographing Kids
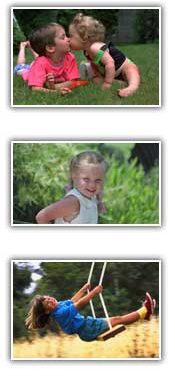
Capturing a child's "best" side isn't always easy-at least not without knowing the best way to go about it. You can have the patience of Job and still not get the results you want if you're not comfortable with your camera. And nothing will send a child hightailing it for the woods faster than that old familiar refrain, "Hold it for a minute while I figure this thing out."
To be sure that doesn't happen, double check your camera's battery. If it seems weak (or if it's been in the camera for a year or more), replace it. Then check to see that there's plenty of film in the camera. Some point-and-shoot models won't fire if the camera is empty. Here are a few more tips for getting really great kid shots.
Get Close
Nobody likes looking at a photograph of three ants on a football field. Instead, get in nice and close (or use a zoom or a telephoto lens to accomplish the same effect) to fill the frame with the subject. Filling the frame also means you won't have to compete with those annoying, distracting backgrounds. And you'll end up with some nice close-ups of your children's expressions instead of a distant shot of three purple jump suits against a sea of green grass.
Get Down
That's especially important when photographing infants and toddlers. Getting down to their eye level will add interest and drama to your photos and help establish a person-to-person rapport between the viewer and the subject.
Get Help
Everybody needs a helping hand now and again. Or, in the case of photographing children, a helping thing. A toy or a key chain, for example, makes an ideal center of attention for a young child, giving you the time you need to focus, compose, and get exactly the shot you want. But even older children can benefit from props such as baseballs, basketballs, croquet mallets, and Frisbees. Props give kids something to concentrate on besides the camera. That means you'll end up with more interesting, more natural-looking photos. And where photographing children is concerned, that's the name of the game. Back to top
Nighttime & Low-Light Conditions

We have a lot of associations with moonlight -- romance, mystery, peacefulness -- and it is relatively easy to record those moods on film. A scene illuminated by moonlight, however, is about two million times (21 f-stops) dimmer than one illuminated by direct sunlight. So in order to get a good image, plan to shoot on nights when the sky is relatively clear and the moon is full or close to it. Also use a tripod or other firm camera support so that you can take long exposures. And use a high-speed film, possibly one that you can have push-processed for a higher ISO rating.
To get correct exposure, use the exposure table or a very sensitive meter. The danger in using a meter is, surprisingly, that you may overexpose the scene. The meter is programmed to indicate settings that will make the scene appear of average brightness. By following the meter exactly, it is easy to make a moonlit scene look as if it had been taken in daylight. To avoid this result, use 25 to 50 percent less exposre than your meter indicates. On an automatic camera, set the exposure override control in the underexposure direction or reset your film-speed dial to twice its correct setting. This exposure adjustment is essential with slide films. It is less critical with negative films because the lightness or darkness of the image can be controlled during the printmaking process.
The type of film you select can also have a major effect on the color in the final image of a moonlit scene. A film balanced for tungsten light will produce a cool blue cast. A daylight-balanced slide film or color negative film will favor the red end of the spectrum and give the picture a warmer appearance.
Portrait Photography

Getting To Know Your Subject
People's appearances, mannerisms and relationships to us combine to create a distinct identity. Usually these impressions are gathered over a period of time. A portrait is a single, static image that must act as a metaphor for character and soul. It is an exciting challenge for a photographer.
To create a successful portrait, you must learn to isolate those characteristics that reveal a subject's distinctive personality and style. Sometimes the decisive element will be a fleeting facial expression. Other times it will be the way a person dresses or the pose a person strikes. Most often, several elements come together momentarily to provide a visual distillation of personality.
Positioning
The background, setting, and props you select can play a significant role in the message you communicate. Think about the position of the figure in the frame and try not to center it unless you feel that centering makes the most effective statement about your subject. Instead, you can focus attention on the subject by using simple backgrounds, such as sky, a plain wall, or seamless photographic paper. You can minimize distracting backgrounds by shooting at close range, so that your subject fills the camera's frame, or by adjusting the depth of field so that only your subject is sharply focused.
Relaxing
When posing a subject, try to have the person relax as much as possible. Most people are self-conscious in front of a camera. You may need to reduce the tension with light conversation. If the person is seated, suggest that he or she lean slightly forward, a position that feels and looks more natural.
Direction
The direction the subject faces can also affect the mood of a portrait. Photographed straight on, people generally appear stiff and formal, especially if their expression is serious. Turned slightly to the side, for a three-quarters view, a subject usually looks more relaxed. This will also reduce facial distortion if you're using a normal or slightly wide-angle lens. Profiles, although frequently unflattering to the shape of the nose and chin, are nearly always dramatic.
Camera Angle
A normal eye-level angle is best for most portraits. Too high an angle -- often a problem in photographing children and seated subjects -- can make the head loom and foreshorten the body. Too low an angle may result in an overly prominent nose or chin. But at reasonable distances, a slightly low or high angle can be used creatively. To dramatically isolate your subject, utilize a high angle. In a full-length portrait, an eye-level shot makes a subject look shorter. A picture taken from a squatting position indicates height more accurately; an even lower angle can make the subject seem taller.
Lighting
Lighting is especially important in protraiture. Depending on its angle, intensity and diffuseness, light can emphasize certain features and soften or obscure others. Light aimed directly at the subject tends to flatten facial and bodily contours and wash out details, although sometimes this can abstract the figure in interesting ways. For most portraits, light coming from an angle slightly above and to the side of the camera is preferable. This sidelighting brings out textures in the subject's skin, hair and clothing that can be character-revealing. More important, it produces shadows, which give a rounded, three-dimensional appearance to a subject.
Too bright a light may create harsh shadows on one side of the subject's face. To compensate, use a reflector or less-pwerful diffused light to fill in the shadows produced by the main light. Just moving your subject closer to a light-colored wall or having someone hold up a large sheet of white paper may provide all the extra reflection you need. In general, however, the best way to lower the contrast between highlights and shadows is to avoid using intense, direct light. Most portraitists favor soft, indirect light that illuminates the subject more evenly.
Tools
Lenses
A telephoto lens with a focal length between 75 and 135 mm, although useful for many other subjects, is often called a portrait lens. This is because it allows you to maintain a comfortable working distance from the subject and yet achieve a flattering, detailed likeness with a minimum of distortion. The short telephoto lens is particularly appropriate for close head shots in which even a normal lens might distort facial features. But the normal lens and sometimes a wide-angle lens are useful in showing a subject in natural surroundings, particularly if space is limited. Whatever lens you choose, if you intend to photograph your subject in available indoor light you will need one with a relatively large maximum aperture, such as f2.8 or larger.
Reflectors
If you plan to work with available light, a reflector should be considered basic equipment. A large white card produces a soft reflected light; crinkled foil pasted to a sheet of cardboard will give you a brighter, more directional reflection. Electronic flash is also helpful in supplementing existing light. Outdoors, you can use flash to fill in strong shadows caused by the sun in a side- or back-lighted subject. Indoors, it can be bounced off walls, ceilings, reflectors, or umbrellas as a subtle supplement to light from a window. It can also serve as the main source of illumination.
Film and Tripods
Your choice of film will depend primarily on lighting conditions. A higher-speed film, from ISO 400 to 1600, may be necessary indoors, in dim light outdoors, or with restless subjects, such as children or pets. But the increased graininess typical in higher speed films may detract from some subjects. Lower speed films, ISO 25 to 125, produce a sharper, less grainy image, but to use them in dim light, you will probably need a tripod, which permits slower shutter speeds. If your subject is fairly static, you can use exposures of 1/15, 1/8, and even 1/4 of a second with a tripod.
Skylights and Other Equipment
In addition to a tripod, certain other equipment can be useful to the portrait photographer. A skylight of 81 series filter will warm the bluish hue common to outdoor portraits taken in open shade, and a diffusion filter will soften an image, minimizing wrinkles, freckles and blemishes. A vignetting lens attachment is useful for isolating a subject. Finally, while a good camera and lens and well-planned lighting make your pictures technically better, you must remember that the most important tool you bring to a portrait shooting is your own personality. Your ability to relax and draw out your subject's inner personality is the crucial element in any successful portrait.
Sports Photography

Outdoor Sports
Whether the subject is the explosive spring of a high-diver or a jumping horse clearing a fence, the key to getting a good action shot is in presetting your camera to suit the particular event. Many sports photographers favor fast film so that they can use both small apertures for good depth of field and the higher shutter speeds that freezing action requires. When the action you want to shoot is confined to one spot, however, a wider aperture may be more appropriate. This will enable you to focus selectively on the main point of interest and to blur a distracting background. Preset your camera and focus on the spot before the action begins. It may help to scout the playing field or arena in advance to determine the most advantageous position. For night sports, take exposure readings from the lighted field because darker surrounding areas will cause the meter to indicate too much exposure. Flash is ineffective unless you're very close to the action, and its use may result in underexposed pictures. Because artificial light requires larger apertures and slower shutter speeds, it may be difficult to freeze fast-moving action. Although any camera can capture action close at hand, a telephoto lens is needed to cover action at a distance. Depending on how far away you are from the activity, the focal length of the lens can range from 85 mm upwards. Lenses over 200 mm are difficult to handhold, so a tripod or unipod may be necessary. A zoom lens with a range of 80 to 200 mm is also very handy. The combination of a fast shutter speed and small aperture usually requires relatively high-speed film, ISO 400 or higher, depending on the brightness of the scene. A motor drive, which permits several rapid sequential shots of fast-changing action, is especially helpful when photographing fast-paced sports events.
Indoor Sports
Good indoor action pictures demand much from both the photographer and the equipment used. The larger apertures required in dimmer light reduce depth of field, while slower shutter speeds make stopping action far more difficult. Timing and camera technique are crucial. At a sporting event with wide-ranging action, such as basketball, use your continuous-focus mode to follow and focus on the action as it occurs. Or, for more predictable results, choose one spot where action is likely to occur (such as under the basket), use your single-shot mode to prefocus on that spot, and then shoot when the action comes into the frame. To avoid exposure errors from overly dark backgrounds (or bright ceiling lights), shift to a spot-metering mode. If you're forced to use slower shutter speeds, look for moments when movement hesitates -- or conversely, exploit the motion to add excitement. Unless you're close to the action, you'll need a telephoto lens. Because relatively dim light will require a large maximum aperture f/2.8 or wider, the lens should probably be a telephoto with a focal length between 80 and 135 mm. There are longer lenses and zooms with large apertures, but they are considerably more expensive.
High or very high-speed film -- ISO 400, 1000, or 1600 -- is advisable. Unless you know in advance the color temperature of the available light (ask a photographer who has taken pictures at the location), you'll have to experiment with different films to find the right color balance. Flash, if permitted, can be effective in stopping motion with daylight-balanced films, but you'll need a fairly powered unit. Higher-speed films will give you more range and/or faster recycling times with dedicated and automatic flash units.
Shooting Great Sunsets & Sunrises

Dramatic Images
Sunrise and sunset are two of nature's grandest spectacles. Whether they are the main subject of a picture or are included in a broader vista, they assure an image with a dramatically heightened mood. Fortunately, both sunrises and sunsets can be recorded successfully on film over a wide range of exposure settings, allowing you to determine the effect that is best for a particular scene. As an extremely bright source of light, however, the sun will cause your camera's built-in meter to respond inaccurately when it is included in the scene.
Sun as Subject
If the sun itself is the subject of your picture, take you reading from the brightness of the sky and clouds -- not directly from the sun. This will slightly underexpose the scene and produce deep rick colors in the clouds. It will also darken the foreground so that trees, buildings or people will be silhouetted against the sky, forming a dramatic frame. The effect can be heightened by giving a scene an f-stop or two less exposure. Look especially for scenes with a slight amount of haze or mist, as the fine particles of water in the air will pick up and reflect the sun's colors. And try using a telephoto lens to make the sun appear larger and more dominant.
Sun as Backdrop
If the sun is to be a backdrop for a more panoramic picture, angle your camera downward and take a reading off the foreground. This will prevent the foreground from becoming a silhouette, but the sun and sky will be overexposed, appearing lighter and closer to normal daylight. Similarly, you can often get more dramatic results by shooting when the sun is not in the picture -- when it is hidden behind a cloud or at the moment just after it sets or just before it rises. Back to top
Photographing Varying Weather Conditions

Overcast skies
The quality of light can be excellent on dank, dreary days. Rather than producing harsh contrasts between bright highlights and deep shadows, light filtered through a canopy of clouds is even and diffused. Contrasts are soft and subtle. Colors are rich and fully saturated. Bright colors that would ordinarily clash with each other or overwhelm muted hues become more harmonious and part of a unified image.
Scenes photographed on an overcast day usually work best when you move in close and fill the entire image area with shapes and colors, since the sky is often an uninteresting, washed-out grey or white. Sometimes, however, a bland sky can provide a plain backdrop that sharply sets off interesting foreground elements. But try to keep your horizon line relatively high so that there is more ground than sky, and, if possible, mask part of the sky with a foreground frame such as overhanging tree branches.
Even when the sky looks grey, it can still be bright, and when it is included in a scene, it can mislead your camera's meter into making an underexposure that silhouettes the foreground. Take your reading off the foreground or an 18 percent grey card.
The lighting on an overcast day is excellent for outdoor portraits. Its soft, diffused quality is always flattering because it gently reveals the contours of the face with faint, almost imperceptible shadows.
Fog and Mist
The soft, hazy atmosphere created by fog and mist can be especially effective in photographs because it obscures more than it shows. In fog and mist, the farther an object is from the camera, the more it seems to dissolve and merge with the murky background. Even a fairly cluttered scene, such as a forest, is greatly simplified. Only subjects close to your camera stand out, and colors are so muted that they look almost monochromatic.
Fog, like sand and snow, is a bright, hgih-key subject and can fool a light meter into calling for underexposure. The best exposure will frequently be one of two f-stops more exposure than what the meter says. It's usually best to take the meter reading off an 18 percent grey card or a middle tone in the foreground.
The best place to find hazy conditions is on or near bodies of water, and the best time of day is early morning, before the sun has had a chance to burn off the night's accumulation of mist. Look for strong, distinctive shapes, especially ones that stand out against the haziness as dark silhouettes. Because the lighting is usually dim, plan to use a high-speed film and, if you go out especially early, take along a tripod for the necessary long exposures.
Storms and lightning
Storms, especially electrical storms, are among the most spectacular shows staged by nature, and capturing them on film is challenging. Luckily, the most dramatic shots of storm clouds can be taken as the storm approaches or leaves. It is during these transitional periods that you can get striking contrasts between areas that are clouded and ones that are sunlit. Sunlight breaking through dark clouds or creating bright rim lighting along their edges is especially attractive. Since lighting conditions are uneven and rapidly changing at such times, be sure to bracket your exposures.
Lightning can usually be photographed only during the height of a storm. To protect both yourself and your camera, you should always take your pictures from a safe cover. It is next to impossible to photograph lightning during the daytime unless you are waiting with eye on the viewfinder and finger on the shutter. And even then you may miss it. You'll find it much easier to work and will usually get more dramatic results if you make a time exposure at night.
Set up your camera on a tripod and point it at the area of the sky where most of the lightning seems to be occurring. Set your camera's shutter speed dial on B. Then open the shutter using a cable release and hold it open until a bolt streaks out of the clouds. Be sure to work in a dark area and to pick a scene that does not include light from houses or street lights. Exposure is mostly a matter of guesswork. Bracket by making several time exposures at different apertures. A good starting point is f/5.6 with ISO 60 film. Holding the shutter open for too long causes an overexposure of the surrounding area. Heat flashes between clouds can also ruin a frame.
Rainbows
In the aftermath of a rainstorm, nature sometimes provides us with one of its most delicate visual treats, the rainbow. A rainbow is caused by particles of moisture in the air that act as tiny prims to diffract the light, breaking it up into a spectral array of wavelengths of different colors. The phenomenon is not limited to rain-soaked skies; it can occur any place where there is an abundance of moisture in the air. A waterfall, a public fountain, or even a morning mist will often sport a miniature rainbow when sunlight hits at the proper angle.
Rainbows are very transient, rarely lasting more than a few minutes. When you spot one, you have to act quickly. In composing your picture, the chief problem is usually trying to locate, on such short notice, foreground elements that will add interest to the scene. A rainbow alone is beautiful but not likely to be visually compelling. A foreground, such as sailboats, icy branches, or stone figures, provides a sense of place and completes the composition. In exposure, a problem can occur if a large expanse of relatively bright sky is included in the scene. In this case, it is best to take a reading off the foreground. Or, if you want to produce a greater saturation of colors in the rainbow, try underexposing one half-stop from the reading your derived from the foreground. On an automatic camera, termporarily reset your film-speed dial one ISO setting higher.
Wildlife Photography

Where to Find Wildlife
For many of us, the mere mention of "wildlife photography" conjures up rather exotic images: stalking lions across Africa's Serengeti Plain or capturing the rainbow plumage of exotic birds on a trip up the Amazon. But wildlife subjects abound everywhere. National parks and game preserves offer spectacular glimpses of animal life, and you can find subjects for your camera even closer to home. Local woods and fields are filled with small mammals, birds and snakes; marshes provide a haven for migrating native waterfowl; and even a local park or your own backyard has its squirrel and bird populations.
Stalking Animals
Because nearly all wild creatures are both timid and fast, capturing them on film requires a combination of quick reflexes, planning and perserverance. You can learn much about the animals in a particular area from field guides. Especially note the animal's behavior patterns -- their feeding and nesting habits, the time of day they are active, their modes of defense. Once informed, you will know where to look for animals and what reactions to expect from them. The ability to predict animal behavior is an invaluable skill for the wildlife photographer. As a general rule, most animals venture out early in the morning or late in the afternoon rather than at midday.
When you are stalking animals, remember that many wild creatures will accept your presence if you don't appear too threatening. A powerful telephoto lens will help you keep your distance, but it is equally important to keep your movement to a minimum. When you do move, proceed slowly and carefully. Nothing frightens an animal faster than an abrupt action. Seek out some natural cover that still gives good visibility. Remember that the senses of hearing and smell in many animals are much keener than ours. If possible, set your camera up on a tripod in a location that gives you maximum advantage -- clear visibility, a safe distance from any real danger and some natural cover. It is sometimes a good idea to wrap the camera in dark cloth to muffle the sound of the shutter and prevent reflections.
Zoo Shots
Less elaborate procedures are needed to photograph the more exotic and accessible subjects at zoos. Captive animals photographed in natural-looking environs or parklike settings often appear as authentic as their counterparts in the wild. Carefully select your camera angle to exclude moats, railings and other signs of captivity. The best kind of picture to take in a zoo is a close portrait with a telephoto lens, including as little intruding surroundings as possible.
Close-Ups
Like portraits of people, close-ups of animals will be most flattering when the illumination is the soft, even light of an overcast day. The low, raking light of morning or afternoon effectively emphasizes an animal's contours and the texture of its fur or feathers. In strong daylight, you should be able to use the fast shutter speeds necessary to capture a moving subject. The shallow depth of field that results from large apertures can subdue foliage interference between you and your subject or effectively separate the animal from an intentionally blurred background. Panning can also help you isolate a moving animal from a nondescript setting.
Lenses
Because wild animals instinctively keep their distance from humans -- and you'll want to keep your distance from them if they are dangerous -- an SLR equipped with a long telephoto lens is by far the best choice for wildlife photography. A lens with a focal length between 200 and 400 mm will pull most subjects close enough to fill the frame, yet will not be too cumbersome or difficult to use. Lenses of mirror-telephoto design are available in 300 mm focal lengths and beyond and offer more compactness at a price, both monetary and optical. Any lens in this range of focal lengths, however, must be used conscientiously. Depth of field is extremely shallow, particularly with the wide aperatures required to compensate for the higher shutter speeds needed to photograph moving animals, so careful focusing is essential in keeping your subject sharp. And because of the degree of magnification of these lenses, they can emphasize even slight camera movement.
Film and Tripods
Given these conditions, it helps to use medium- or high-speed film, ISO 200, 400, or 1000. Pushing film is another possibility. But it is also essential to steady the camera. Depending on the circumstances, a long lens can be supported on a tree stump or the hood of a car with a folded jacket under the camera. Some nature photographers even carry a small bag filled with beans for such shots. You should, however, carry a tripod or unipod as basic wildlife equipment, and you might want to consider using a gunstock support.
Blinds
Another helpful device is the blind, a small tentlike construction with a hole in the side for your camera lens. It is especially useful in open areas where there are no trees or bushes for cover. You can purchase one from a hunting supply store or you can construct one using canvas and a light wooden frame. Many animals, notably birds, quickly become accustomed to a blind and return to their normal activities in its presence.
Remote Releases
A remote release, which allows you to trip the shutter at a distance from the camera, is also useful for dangerous or extremely shy subjects, or for tricky situations such as photographing a bird's nest from a nearby branch. A simple bulb-and-air-hose release allows you to take a picture up to twenty feet away. Another kind of remote release has a battery-powered electromagnetic plunger that can push the shutter button from an even greater distance. And an expensive radio-controlled release can trip the shutter from more than a mile away. You can also arrange to have your subject unwittingly trip the shutter with a cord attached to a lever that depresses the shutter button. A more sophisticated trip device uses photoelectric cells to actuate a plunger. To take more than one shot of a subject with a remote release, you need an automatic winder or motor drive.